This is a guest post written by Justine Nelson, Founder of Debt Free Millennials.
As a budding entrepreneur, I had my sights set on creating a YouTube channel. I thought, “This will be a piece of cake.” Record yourself talking about topics related to your business, make a few edits and upload. Boom.
Dead wrong.
Finding something to talk about actually proved to be a lot of work. What topics in my industry are the hottest right now? What do I write in the description below the video? How long should this freaking thing even be? And let’s not forget about all the editing that’s involved. That can take hours.
At the end of this whole process, I was exhausted. I was barely getting one video out per month. That’s a no-no for YouTube rankings. I knew I needed to do more and in less time.
Over the course of eight weeks, I completely changed how I approached video content creation and was able to quadruple my YouTube video production for my channel Debt Free Millennials. Here’s how I did it.
Content Batching
My initial approach was to focus all of my energy on producing one video. I used to research, record, edit, and schedule one video before moving on to the next. This proved to be counter-productive. Now, I content batch.
Content batching means repeating similar tasks for multiple pieces of content at the same time. My goal is to deliver one new YouTube video per week, so I started researching four video ideas at the same time.
I content batch in one week to produce four videos. Here’s what my content batching week looks like:
Day 1 – Keyword research and topic selection
Day 2 – Content outline
Day 3 – Primp and record
Day 4 – Edit
Day 5 – Schedule
Keyword Research
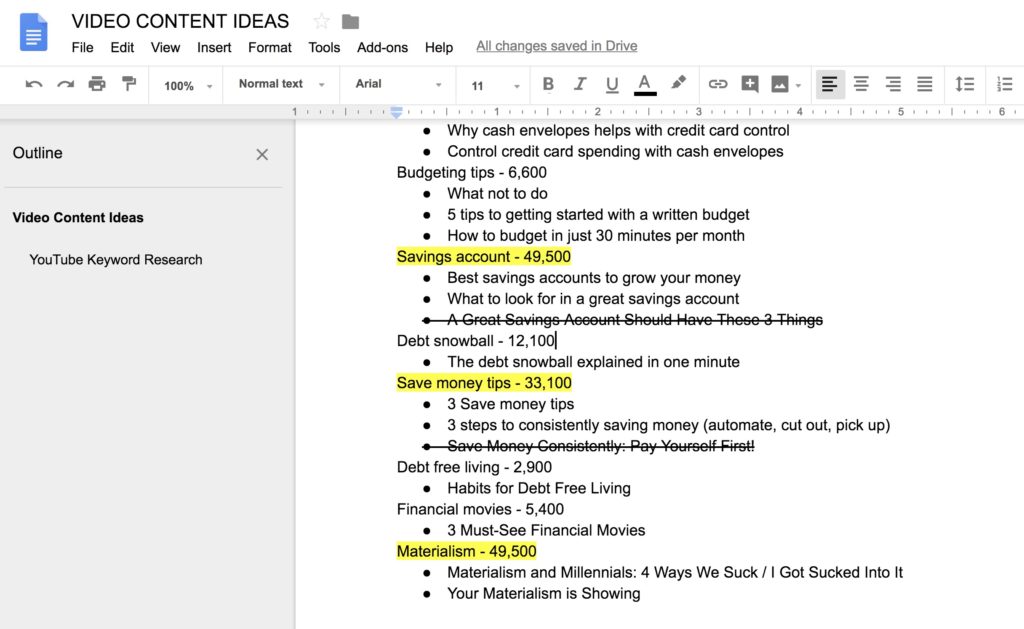
I became a lot faster at selecting what topic I wanted to talk about with the Keywords Everywhere Chrome extension. When I type keywords into the YouTube search bar, I automatically see how many times a it’s searched for on a monthly basis.

Each keyword and monthly search results are recorded in a Google Doc labeled Video Content Ideas. I highlight topics with the most search results and start brainstorming a clever video title that fits the keyword.
Content Outline
Now that I had my video topics selected, I needed to flesh out the idea more. A video content outline template helped me organize my thoughts and keep the videos consistent. By writing down the outline, I was better prepared during production so I didn’t lose my train of thought.
Here’s what my video content outline template looks like:
- Title
- What do I want people to get out of this video?
- Intro
- Key ideas
- Outro / CTA
- B-roll
- YouTube description
Caleb Wojcik, creator of DIY Video Guy, has some great advice for YouTubers in his course, DIY Video Production Guide for Course Creators. He suggested in that you ask yourself, “What do I want people to get out of this video?” before you record. This helped me get clear on what the main message was of the video.
Soon, I was writing content outlines one after the other because I had all of the topics pre-selected. Easy breezy. I was back in Cover Girl mode, and I was liking it.
4x Production
Once my content outlines were complete, I practiced talking through the content out loud for an hour. Now, it’s time to record. My “studio” is actually just my kitchen table. My camera equipment gets setup, including small lights, laptop, and tripod. Next, I get camera-ready by doing my hair and makeup and getting some good tunes and a coffee going so I feel excited. It comes across in your delivery!
After primping, I make sure my apartment is as sound proof as possible. I close all the windows and make sure the AC isn’t audible. Then I hit record. If I mess up, I keep going because I can edit that out later. Once I record a video completely, I change my top and style my hair differently so it appears I’m filming on a different day, but I’m not.
Call me a trickster, but my YouTube subscribers will never know. Unless they read this post.
Faster Editing
With all of the videos recorded, it’s time to get into the editing. The tool that I use for editing is plain old iMovie. It allows me to cut footage, add lower-thirds (the text that goes on top of your video), and audio. Working on simple edits first, I cut out long pauses and flubs. As I watch footage, I find areas where I can add B-roll (additional video or photography that might help tell the story).
Sometimes I’ll add sound effects that I find in iMovie for free or I’ll purchase inexpensive tracks from 123rf.com for more variety. Adding B-roll happens during my second pass through of editing. Once I’m happy with the way it’s shaping up, I add my pre-recorded intro and outro slides with my theme music, give it a watch through one more time and then I’m done!
Final files are formatted using a free tool called Handbrake that keeps my file size low and my upload time fast.
Descriptions and Scheduling
Finally, I go back into my video content outline docs and add descriptions for each video and make sure any links going back to my website are set up for tracking inside of Google Analytics. Every video also gets a custom thumbnail graphic that I create in Canva.
Videos are then scheduled to go live every Thursday of the month. All that’s left is to create emails and social posts to help drive traffic.
Take Your Video Production to the Next Level
Content creation for YouTube doesn’t have to be a long, drawn out process. When you content batch like I do, you can drastically cut down the amount of time it takes to put together a video and you increase your content production.
I timed myself to see how long it took me to produce one month’s worth of videos last month. The result? It took me 10 hours to completely produce four videos. That’s just two hours per day for one work week. Not too shabby! Give content batching a try and let me know how it goes for you by getting in touch on Instagram or Twitter!